Perio Exams
|
When using the Perio Chart module, you can complete a variety of tasks related to perio exams, including:
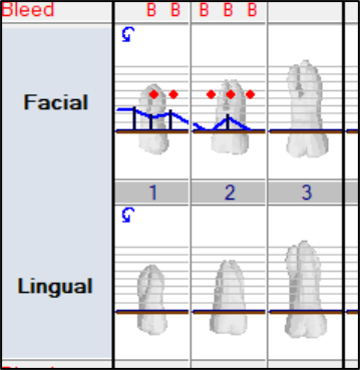
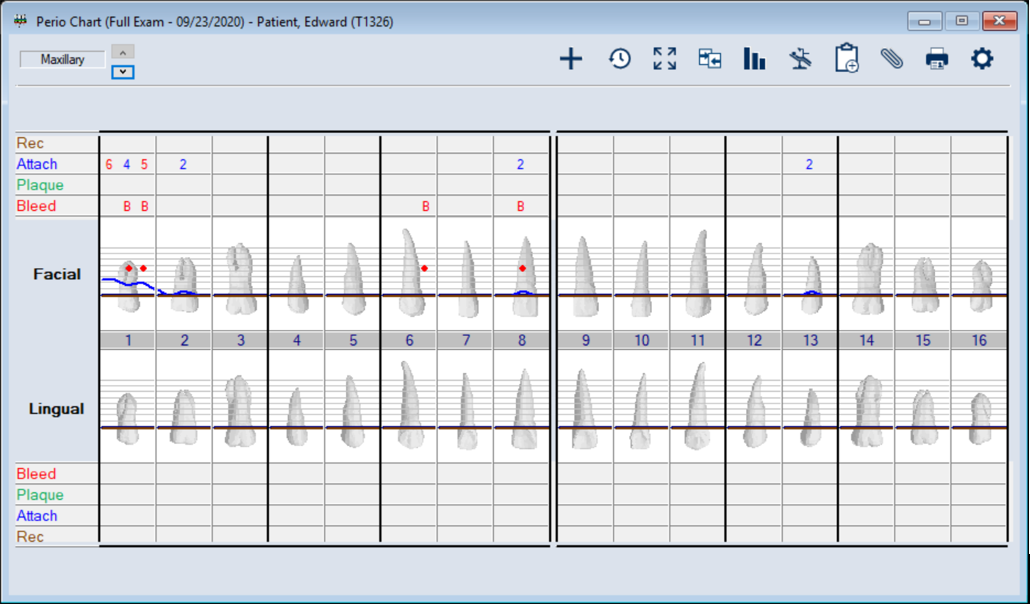
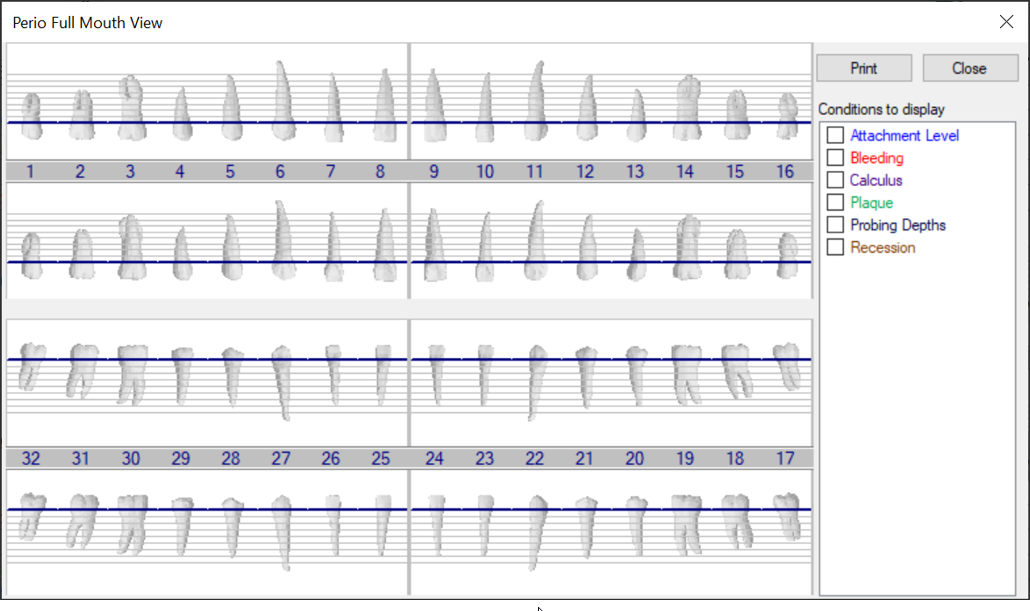
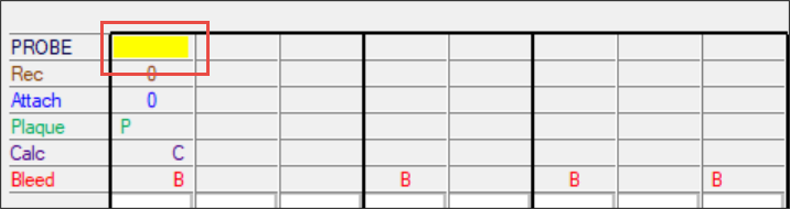
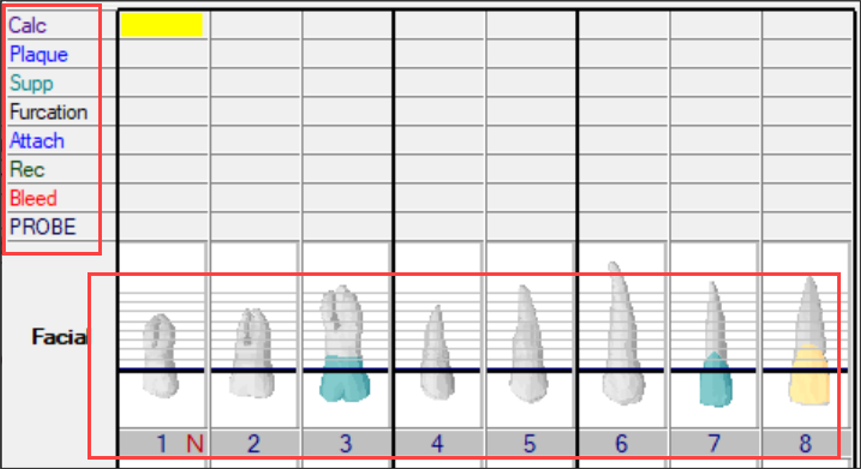
The values and condition symbols from a patient’s most recent perio exam display on the odontogram in the Perio Chart window. Note: A patient’s most recent perio exam is their latest exam, regardless of whether it is incomplete, complete, or closed. Depending on how conditions are configured for your institution during setup, the color may be customized, the values may display as numeric, alphanumeric, or as yes/no, and the symbols may include lines, bars, text, or dots. Example: In the case below, a bleeding condition has been identified on the sites 1, 2, 6 and 8. Each is marked with a B and a red dot on the odontogram. If you want to monitor changes between multiple exams, you can also compare individual conditions across multiple exams.
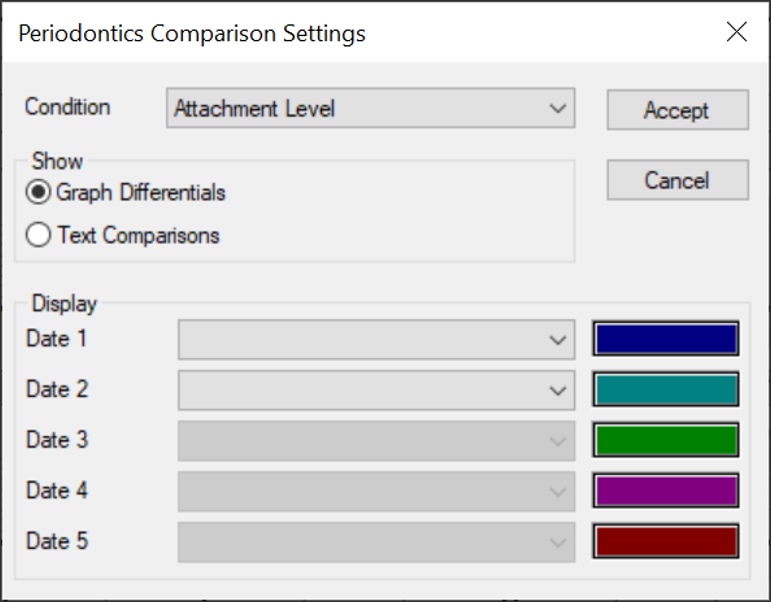
When there are multiple exams on a patient record, you can compare them by individual condition to gauge changes in a patient's perio health and monitor patient progress. Note: You can compare up to five exams at a time. When necessary, you can also print the perio record comparisons. To compare conditions across exams:
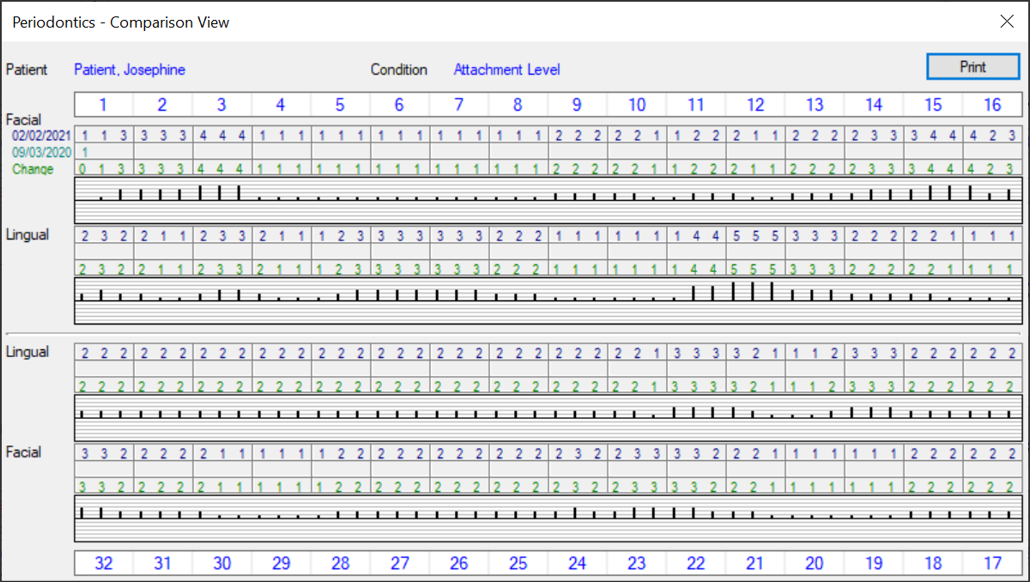
Note: If the Graph Differentials radio button is selected, you can only select two exam dates. Graphic View: The patient name and condition being compared display at the top of the window. For each of the selected exam dates, axiUm displays the value(s) for the condition entered on that date. The amount of change between the two dates is listed under the last exam date and displayed in a bar graph below that.
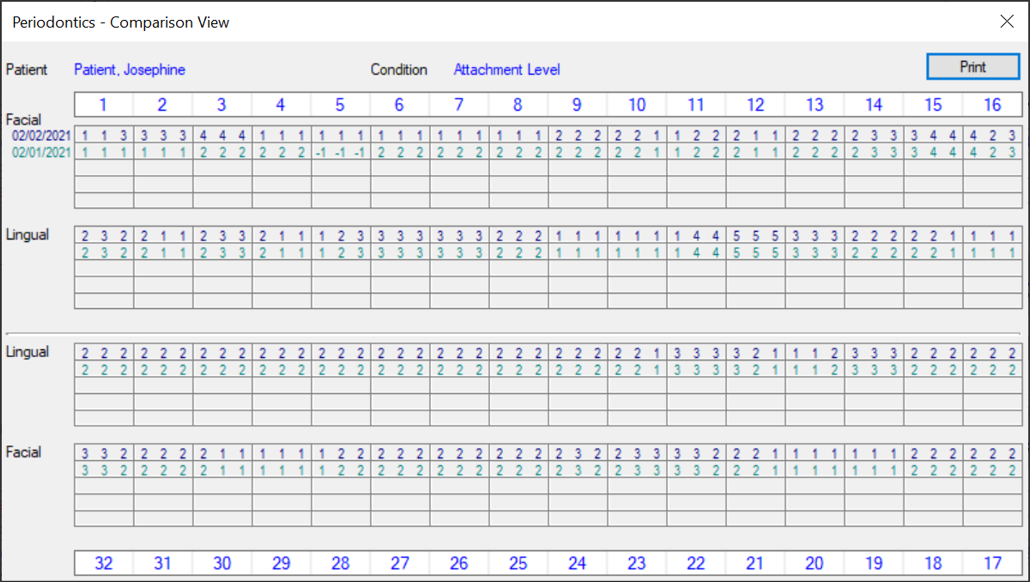
Text View: The patient name and condition being compared display at the top of the window. For each of the selected exam dates, axiUm displays the value(s) for the condition entered on that date.
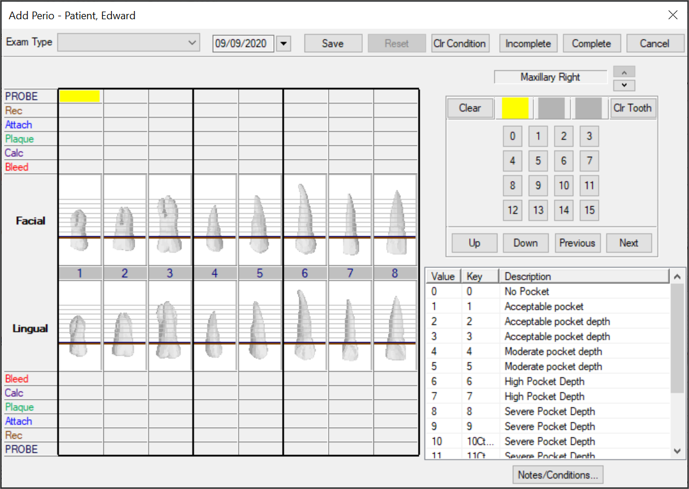
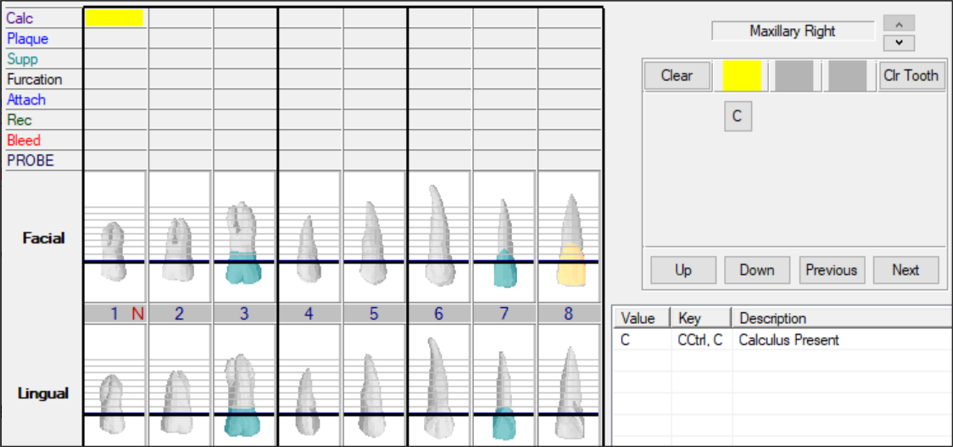
Tip: Ideally, a perio exam is performed at least once a year. A perio exam offers a visual representation of the patient’s mouth and gums at a certain point in time and allows providers to chart the conditions of a patient’s mouth. Examples: Pocket depth, plaque, and bleeding. Each exam lists the conditions used by your institution on the left side of the window and a series of buttons on the right side, as well as the values available below. The entry portion is made up of cells that you can enter values into. It also offers Up / Down buttons that allow you to alternate the jaw view between Maxillary and Mandibular.
When completing an exam, follow the charting method used at your dental institution to progress through the patient’s mouth. Examples:
Depending on the condition, sites are charted on one or two sides (either buccal/facial and lingual), and each side has between one and three surfaces. Example: Mobility is only charted once per tooth, but pocket depth can be charted on multiple sides of a site. Note: Your charting method is determined by your user group and user groups may have different charting method requirements. Up to six surfaces that may be charted at each site during an exam. They include the following:
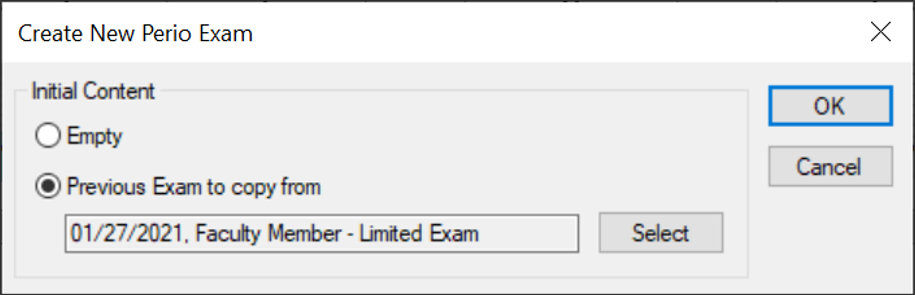
Examples: In most cases, pocket depth is charted on all six surfaces of a tooth, but furcation may only be charted on certain sides of a tooth, depending where it is located in the mouth. Some conditions may be charted on sites that missing teeth and some may not. Examples: A missing tooth may still have bleeding in the area, while you cannot chart mobility on a missing tooth. When adding a perio exam, you have two options. You can add a blank exam or add an exam with the contents copied from a previous exam. Note: This includes exams that have been deleted. Example: You may want to copy a previous exam’s contents if the patient has previously attended your dental institution, and you want to quickly capture any changes to existing conditions. Note: Depending on your configuration, a blank exam may display by default. To add a perio exam:
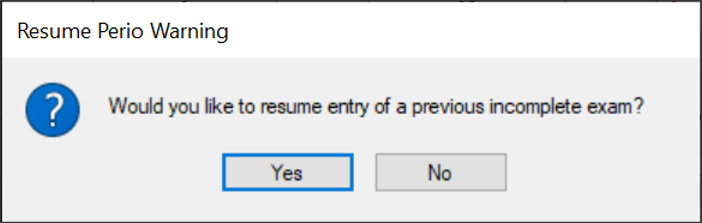
Tip: You can also add a perio exam from the EHR module > Perio tab. Note: If an incomplete exam is on the patient’s record, the Resume Perio Warning window displays, prompting you to resume the previous exam.
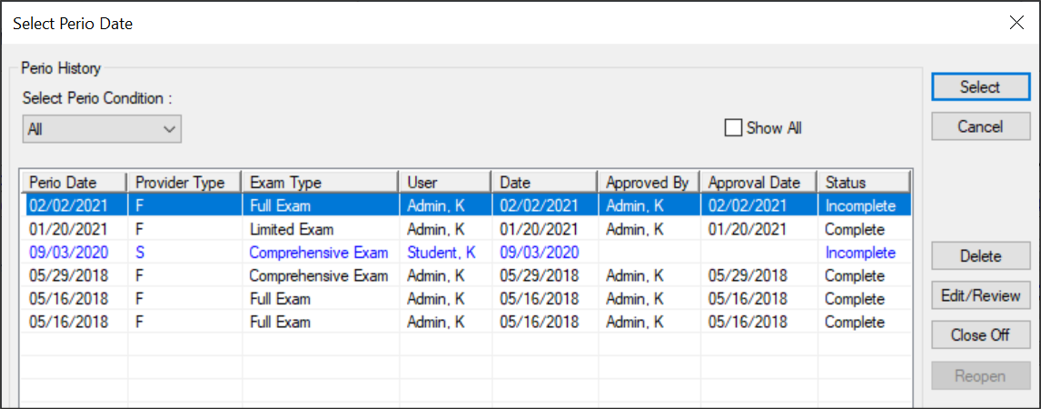
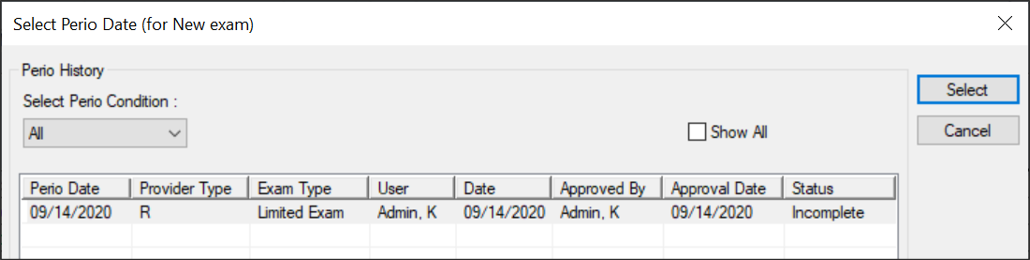
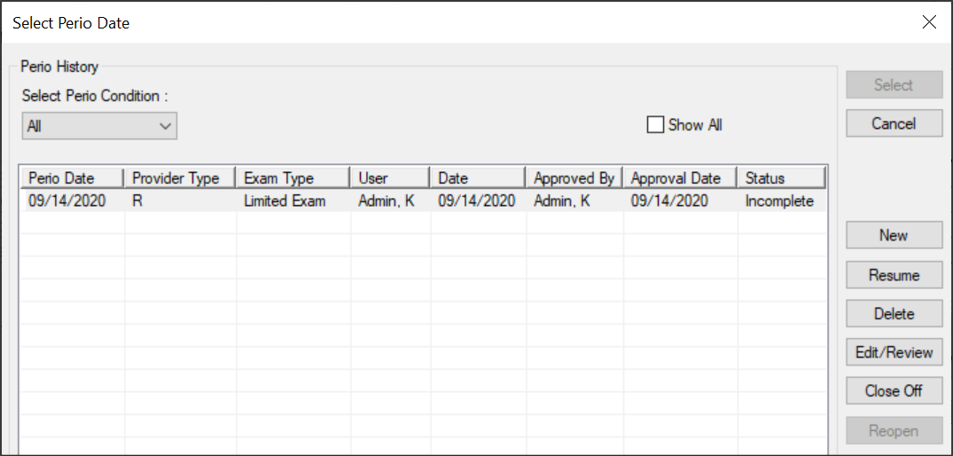
Note: If configured during setup, the Add Perio window may display automatically instead. Tip: To select a different exam, click Select to display the Select Perio Date (for New exam) window, highlight a listed exam, and click Select.
Tip: If you want to copy a deleted exam, select the Show All checkbox to include deleted exams in the list. The Add Perio window displays.
Note: If the exam was copied from a past exam, the current date and the previous exam’s values display. You can resume exams that are incomplete. Exams are considered incomplete if the user did not click Complete before closing.
Tip: You can also add a perio exam from the EHR module > Perio tab.
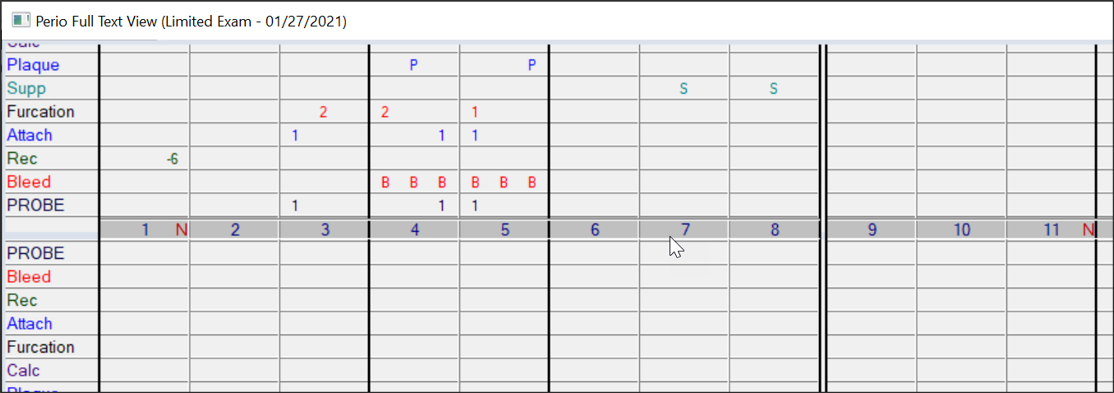
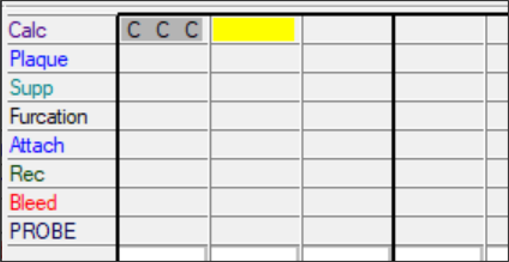
Once you have added or resumed a perio exam, you can chart the exam content. You will need to enter a variety of different conditions along with the correct value for that condition. Example conditions and values: Pocket depths are entered using a numerical value that indicates the severity of the depth (usually 0 - 10) and plaque, bleeding, and suppuration are entered using a letter value that indicates whether the condition is present (usually P, B, and S). Note: Conditions can be customized by your institution during setup. The exact conditions list and the applicable values are determined by your institution. You can navigate and enter conditions using your keyboard arrow keys, num pad, and jump keys or using your mouse and the number pad in axiUm. Conditions are typically charted one at a time, site by site as you examine a patient’s mouth. However, a jump key may be used to enter certain conditions while charting another. When a jump key value is entered, the associated condition is charted for the same site, but you can then continue on with the condition that was previously being charted. Example: While charting pocket depth in the patient’s mouth, you notice the site you are currently charting is bleeding and press B to use the bleeding jump key. This allows you to jump to the bleeding condition line to enter the bleeding, and then return to charting pocket depth without having to move the cursor manually to the condition/site. A yellow indicator displays to mark which cell you are in relation to a condition and site.
Once charted, conditions display on the exam with a line, bar, text, or dot symbol. Depending on your institution’s setup, several customized features may be available to you during charting:
Your institution has configured perio charting details that determine how your perio exam progresses. This includes:
Example charting methods:
Standard charting workflow:
Tip: While charting an exam, click Save often as you progress. To chart a perio exam:
Tip: This may require you to add an exam or resume an incomplete exam.
Note: This list is configured by your institution during setup. Note: The acceptable value(s) and jump keys for each condition are displayed in the legend on the left.
After entering 3 facial values on one site, axiUm automatically moves to the next site to continue charting. Once you've charted all applicable surfaces on the site, axiUm automatically advances to the next site and/or quadrant. Note: This is based on your configuration. You may need to manually move to the next site using your arrow keys or mouse. Example: Site 1 > 32 facial. Note: Follow the charting method used at your dental institution. Tip: You can navigate via your keyboard arrow keys, computer mouse, or the Up, Down, Previous, and Next buttons in axiUm. Example: Navigate to the cell next to PROBE (pocket depth) and above site 1.
This clears a condition value from one surface on a site.
This clears condition values from all surfaces on a site.
This allows you to remove conditions from all sites in the exam.
Note: This list is only enabled if the If the Selected Condition(s) radio button is selected. This allows you to revert any changes made since you last saved the exam. Note: This button is only enabled if you are working on a resumed exam.
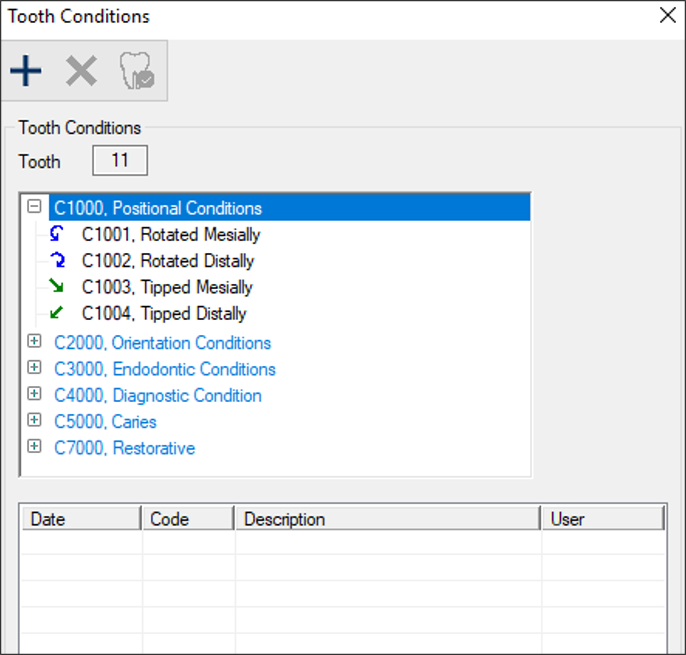
Note: You can also click Save and close the Add Perio window to mark the exam as incomplete. Note: Complete exams cannot be edited later. Once the exam is complete, the values may display in the EHR module > Tx History tab and above and below the odontogram. axiUm allows you to record notes and conditions for individual teeth and surfaces during a perio exam. If a condition is added, a symbol that represents it displays on the tooth or surface. Example: Tooth 1 displays a (
Note: Symbols are configured by your institution and may vary from those shown here. Tooth conditions can also be added from the odontogram in the EHR. To manage tooth notes/conditions during an exam:
Note: You can also delete conditions or mark as resolved from this window by clicking the Delete Record ( Note: When you enter a note that pertains to a specific tooth, the tooth number displays with an N on the odontogram. The record now displays as struck out. You can complete a variety of perio exams tasks when working with the Perio Chart module. This may include editing, closing, reopening, and deleting perio exams.
Tip: You can also edit a perio exam from the EHR module > Perio tab.
When necessary, you can edit saved, incomplete exams. Important: Once an exam is completed and approved by a faculty member or instructor, it cannot be edited. Tip: Look for exams with an Incomplete status. All exams with a Complete status cannot be edited. When necessary, you can close exams. A closed exam is still considered a valid part of the patient record because it includes some charting, but it is incomplete and will not be completed in the future. Note: A closed exam cannot be resumed or edited, and it does not display by default in the Select Perio Date window. However, its values are considered part of the patient record and display on the perio chart if it is the most recent exam. Tip: Look for exams with an Incomplete status. All exams with a Complete status cannot be edited. When necessary, you can re-open closed exams. Example: The exam was closed in error and you want to resume your progress.
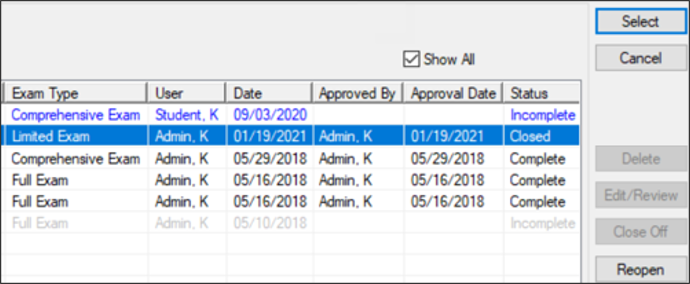
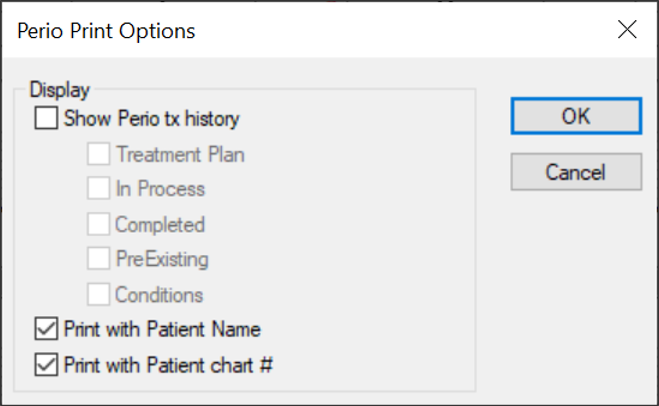
When necessary, you can delete perio exams. Examples: The perio exam was completed in error or entered for the wrong patient. Tip: If deleting a perio exam that is on the wrong patient record, print the exam before deleting, then use the printed copy to add the exam to the correct patient. The deleted exam is removed from the list. Tip: To include deleted exams in the list, select the Show All checkbox. Deleted exams display in grey text. Note: When you select the Show All checkbox, two additional columns display: You can print a patient’s updated perio chart after you perform an exam.
|


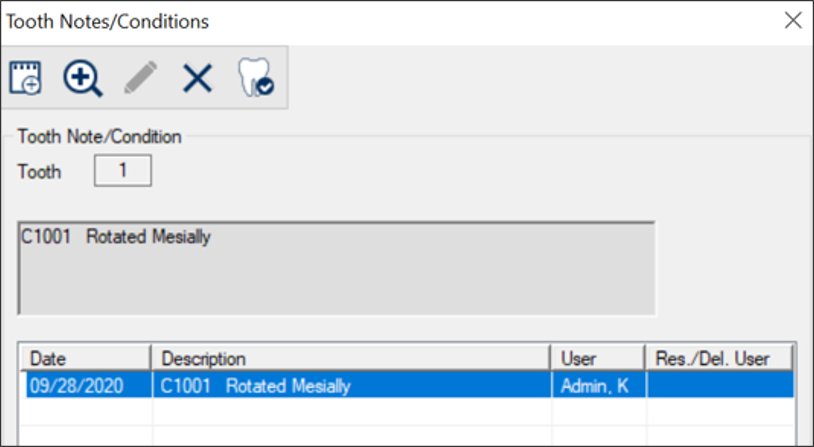
 ) symbol to indicate that the tooth has been Rotated Mesially.